

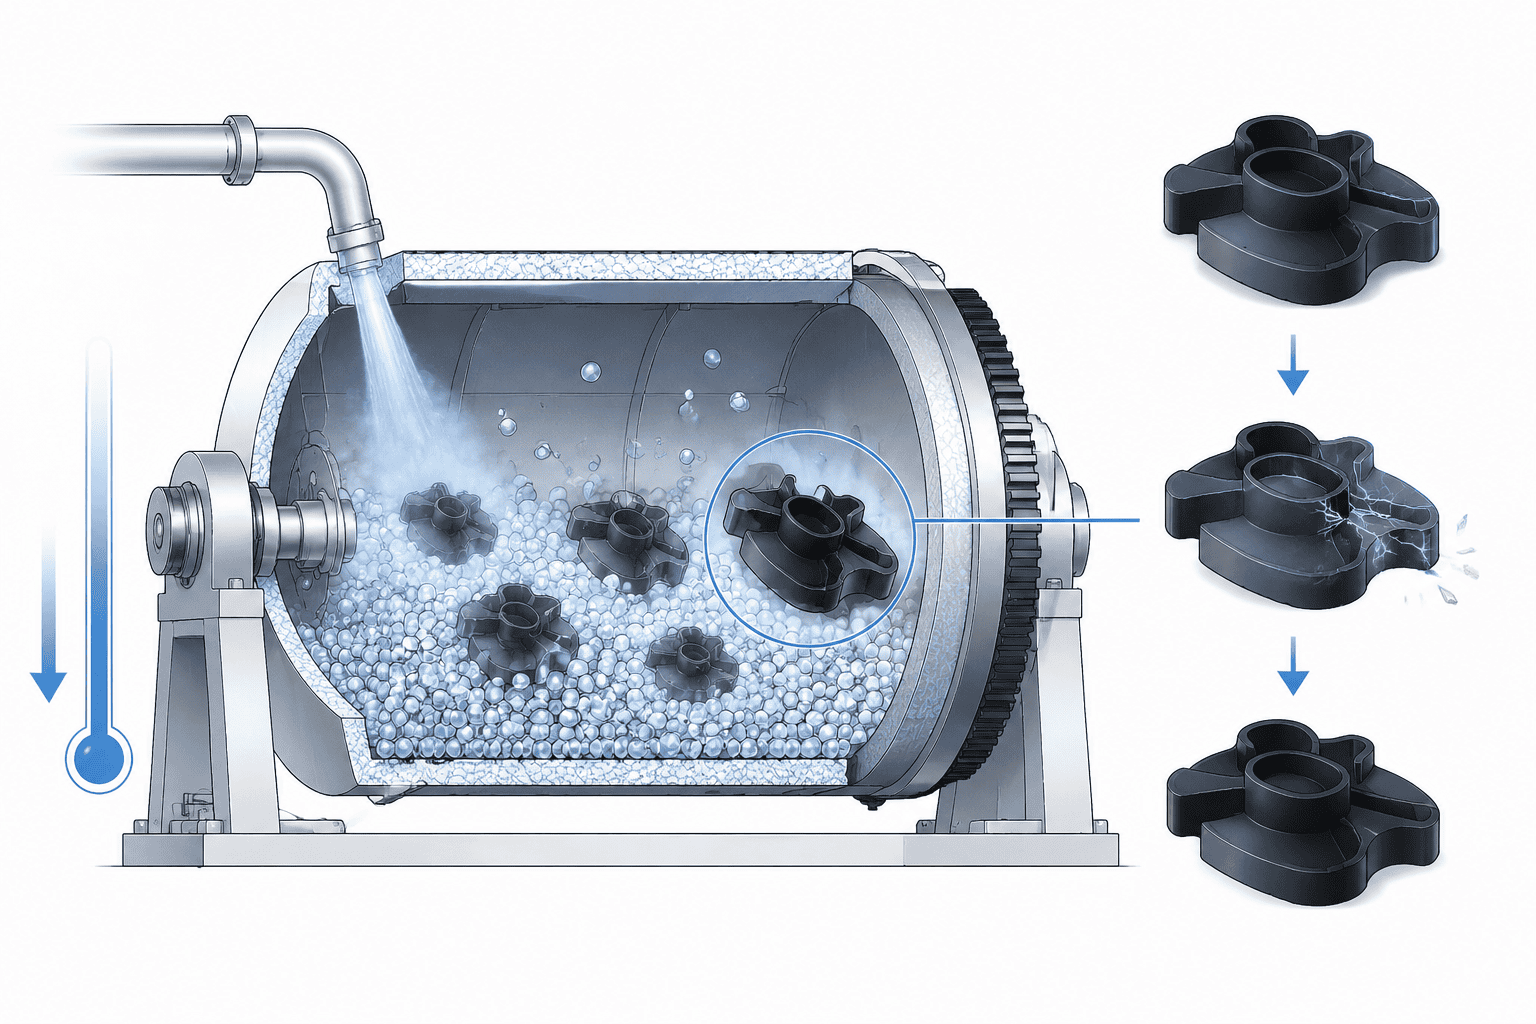
Cryogenic deflashing removes flash from molded rubber and plastic parts by chilling them into liquid nitrogen temperature territory—typically -120°C to -190°C—until the thin flash along parting lines and gates turns brittle, then bombarding that brittle flash with small polymer pellets until it fractures and flies off. The bulk of the part, thicker and tougher at the same temperature, survives the bombardment intact. A full cycle takes minutes and processes hundreds or thousands of small parts in a single batch.
That combination—batch throughput, no cutting tool touching the part, no fixture per geometry—explains why the process dominates flash removal for O-rings, seals, silicone gaskets, and small injection molded components. It also explains why it has nothing in common with how metal flash gets removed, a distinction that quietly derails many sourcing decisions.
This guide covers why molded polymers need their own flash removal process, how the cold does the work, which materials suit it, what a cryogenic deflashing machine contains, the parameters that decide the result, and when to choose the process over manual trimming or fixing the mold instead.
Why Molded Polymers Need Their Own Flash Removal Process
Flash on a molded polymer part is not a metal burr, and treating it like one wastes money. A burr is displaced material—metal pushed sideways by a cutting edge, still attached, still ductile, removable by cutting or grinding. Flash is material that escaped the cavity: rubber or plastic that squeezed through the parting line between mold halves, through blocked vents, or through the gate before it froze. It arrives as thin webs and films, often 0.1-0.5 mm thick, joined to the part along a long, irregular seam. Gate vestige—the stub left where the feed channel separated—adds a second stubborn feature on every part.
The difference that matters is toughness. Elastomers are deliberately elastic. Try to cut flash off a silicone O-ring at production speed and the flash stretches, smears, and tears back into the seal lip rather than separating cleanly. Try to tumble it off with abrasive media and you damage the part before you remove the flash, because the part and the flash are the same material at the same hardness—there is no hardness contrast for the media to exploit, unlike a steel burr seated next to softer base metal.
Cutting tools have the same problem scissors do on soft, stretchy film. The way in is to change the material’s state, not the tool: cool an elastomer far enough below its glass transition temperature and it stops behaving like rubber at all—it becomes brittle, and a modest impact that the room-temperature part would shrug off snaps the flash clean at its root. That state change is the entire foundation of the process.
How the Cold Does the Work: Embrittlement and the Glass Transition
Every polymer has a glass transition temperature, or Tg—a temperature range where it shifts from rubbery or leathery behavior to glassy behavior as molecular motion locks up. Well below Tg, the material cannot absorb impact energy by deforming; cracks propagate through it like through window glass. The flash, thin and fully steeped in that glassy state, fractures. The part body, thicker, with no crack-initiating thin section to fail from, sheds the impacts.
The working window sits well below the flash material’s embrittlement point but is chosen so the part body retains enough residual toughness to resist pellet impact. In practice the drum settles somewhere between roughly -120°C and -190°C depending on the polymer—liquid nitrogen, boiling at -196°C, is the only practical industrial refrigerant that reaches this range, delivered by direct injection with no mechanical refrigeration cycle at all.
Thin flash also reaches full embrittlement faster than the body reaches thermal equilibrium—a 0.2 mm film achieves through-thickness cold in seconds while a 5 mm wall takes far longer—so a fast cycle can fracture the flash while the finished part body never fully experiences the deepest cold.
The second half of the mechanism is the media. Small polymer pellets—typically polycarbonate or nylon spheres in the 0.2-2 mm range—are thrown against the tumbling parts at high velocity, either by a blast wheel or by the drum’s own rotation. The pellets are hard and aggressive at cryogenic temperature, yet light enough that their impact energy breaks a brittle 0.3 mm film without damaging a healthy wall. Because the media is non-abrasive polymer, it removes flash by fracture, not by wear—surfaces, textures, and critical dimensions come through untouched, which is what makes the process viable for seal lips and medical components.
Which Materials Suit Cryogenic Deflashing
Not every polymer embrittles on the same schedule, and material selection is really a question of where the embrittlement window falls and how wide it is.
Elastomers are the classic application. Nitrile (NBR) in the 70-90 durometer range, EPDM, neoprene, and silicone all respond well, and molded seals in these materials are the bread-and-butter workload of the process. Nitrile and EPDM embrittle at relatively modest depths of cold; silicone, with a very low glass transition, demands the deepest temperatures in the common range and the tightest process control. Injection-molded polyurethane also deflashes cryogenically where its thick sections allow.
Engineering plastics run colder but easier. Nylons, including glass- and carbon-filled grades, acetal (POM/Delrin), ABS, LCP, PPS, PEEK, and PEI all process successfully. These materials are already glassy at room temperature—the cold tightens the brittleness further and makes thick gate vestige brittle enough to fracture under pellet impact. LCP connector bodies and PEEK components are routine work in the industry, and overmolded combinations such as PPS over stainless steel inserts deflash cleanly, since the process ignores the metal entirely.
The near-universal exclusion is UHMW polyethylene. Its extreme molecular weight keeps it tough even at deep cryogenic temperatures, so it bends under impacts that should fracture it—most processors decline it outright. Size, not chemistry, sets the other boundary: cryogenic drums handle parts from sub-millimeter thin-wall pieces up to roughly 300 mm across. Beyond that, the geometry does not tumble well, and parts route to dry ice deflashing or manual trimming instead.
One characteristic matters more than newcomers expect: the process is thermally reversible. After the parts return to room temperature, the polymer’s mechanical properties are unchanged—no brittleness carries over, because nothing about the material was transformed, only temporarily stiffened.
What Is Inside a Cryogenic Deflashing Machine
A cryogenic deflashing machine is a compact production cell built around one insulated chamber, and its subsystems divide the work as follows.
The heart is a rotating drum or basket, tilted on a horizontal or inclined axis, fabricated from stainless steel and enclosed in insulation. Parts and media load into the drum together; rotation tumbles the batch so every surface of every part takes its turn facing the media stream. Drum speed is variable, because fragile parts need gentler tumbling than dense loads.
The refrigeration system is a liquid nitrogen injection circuit: a vacuum-jacketed storage tank or Dewar outside the machine, insulated lines, control valves, and injection nozzles feeding the chamber, governed by temperature sensors inside the drum. A controller meters liquid nitrogen against a setpoint, holding the drum within a few degrees through the cycle. There is no compressor and no refrigerant gas—liquid nitrogen is consumed as a utility, the same way a plant consumes compressed air.
The media system does the actual flash removal. In wheel-blast machines, a motor-driven impeller accelerates polymer pellets and throws them into the tumbling parts; in tumble-only designs, the drum’s rotation lifts the mix and lets it cascade, with impacts coming from its own momentum. Either way, flash fragments, dust, and spent media exit through screens at the drum wall, and usable media recirculates with periodic top-ups.
Around those three core systems sit the batch-handling and safety layers: loading ports, media/part separation screens, dust extraction, and—in any responsibly specified machine—oxygen depletion monitoring and forced ventilation, because nitrogen displacing air in an enclosed space is a documented fatality pattern in plants using cryogens. A production run follows a fixed sequence: load, pre-cool to setpoint, blast and tumble, then warm, screen, and discharge. Total elapsed time per batch lands in the 5-15 minute range in typical practice.
Process Parameters That Decide the Result
Three parameters dominate the outcome, and all three are set by trial on the actual parts rather than read from a handbook.
Temperature is the primary lever. The drum setpoint must sit far enough below the flash’s embrittlement point to guarantee fracture, but not so far that the part body grows needlessly brittle or nitrogen consumption climbs for no gain. Nitrile seals commonly process in the -80°C to -110°C band; silicone and other low-Tg elastomers push toward -140°C to -170°C; engineering plastics and gate-vestige work often run anywhere across the -120°C to -190°C span. The correct number for a given part is established on a first-article trial and locked into the recipe.
Time splits into pre-cool and blast stages. Pre-cooling runs 2-5 minutes to bring the batch to setpoint; blasting runs 3-10 minutes, with longer times removing more flash but edging toward part damage and media waste. Under-cycled parts keep flash; over-cycled parts risk nicked thin walls. The minimum time that clears the flash defines the recipe—time costs liquid nitrogen.
Load means how full the drum is, and typical practice fills 30-60% of drum volume. Overloaded drums tumble poorly—parts pack together, media cannot reach the flash, and the batch comes out uneven. Underloaded drums let parts strike each other and the drum wall hard enough to chip delicate features, and they waste nitrogen per part. Media size, media-to-part ratio, and wheel or drum speed round out the secondary settings; media condition is a genuine consumable variable, since worn, rounded pellets cut slower and unmonitored media decay shows up as gradually lengthening cycles.
Post-process handling deserves a line of its own: parts emerge cold, and humid room air condenses water on them. Controlled warm-up, immediate drying, or nitrogen-purged staging prevents water spots and moisture pickup on hygroscopic nylons before inspection.
Typical Applications
The workload that built the process is sealing technology. O-rings in nitrile, silicone, EPDM, and fluorinated grades, shaft seals, gaskets, valve seats, and plugs are deflashed in the millions because the alternative is scalpel work on a rubber torus. Automotive and industrial sealing programs alone account for a large share of global cryogenic deflashing capacity.
Medical and laboratory components form the second pillar: LCP and PEEK surgical instrument parts, Ultem insulators, catheter-related molded components, and silicone tubing fittings. Here the process’s no-contact, no-abrasive character carries the decision—a surface that nothing has rubbed or scratched passes cosmetic and cleanliness scrutiny that mechanical trimming fails. Our aerospace and medical finishing work covers the wider surface-conditioning context these parts live in.
Electronics contributes molded connector bodies, coil bobbins, switch housings, and carbon-filled nylon components where gate vestige interferes with assembly. Consumer and appliance products round it out: overmolded grips, small housings, and cable grommets. The common thread: small, molded, produced in thousands, and intolerant of trimming marks.
Cryogenic Deflashing vs. Metal Flash Removal: Different Physics, Different Machines
Sourcing teams conflate these constantly because both are called deflashing, but the physics have nothing in common. For the full metal-side workflow, see our die casting deburring automation guide. Die cast aluminum or zinc parts also carry flash at the parting line—metal squeezed between die halves under high injection pressure. That flash is ductile metal, and cold makes ductile metals tougher, not more brittle. Deep freezing a die casting and throwing pellets at it accomplishes nothing.
Metal flash comes off by cutting: programmed machine tools, abrasive belts, and force-controlled grinding following the parting line geometry. This is robot territory, and it is the other half of our business. Our case study on automated deflashing and deburring for die-cast motor housings shows the architecture: a robot guiding a casting against belt and brush stations, with the toolpath following each part family’s flash geometry. For surface finishing on those castings, the robotic grinding guide covers force control, media selection, and cycle design in detail.
A related clarification: deflashing and deburring are not synonyms. Deflashing removes flash and gate vestige from molded parts; deburring removes burrs left by machining, stamping, or forming. The same cryogenic machine can do both for polymer parts, since molded and machined plastics alike embrittle; for metals, deburring spans an entirely different equipment landscape, which the deburring machine types guide maps out. For the robot-side concepts—force control, tool selection, path strategy—start with what robotic deburring actually means.
The practical takeaway: if your part is rubber or plastic, cryogenic deflashing or a mold fix is the answer. If it is die cast or machined metal, you need cutting, grinding, and robots. No machine bridges both worlds.
Cryogenic Deflashing, Manual Trimming, or Fixing the Mold
Not every flash problem deserves a cryogenic machine, and honest process planning checks the alternatives first.
Fix the mold first. Flash is a process defect signal, and the cheapest deflashing is the flash that never forms. Worn parting lines, blocked vents, insufficient clamp tonnage, and excessive packing pressure all push material out of the cavity. Mold rework, vent cleaning, and injection parameter tuning eliminate flash at the source and belong ahead of any end-of-pipe decision.
Manual trimming holds niche ground. Large parts that do not tumble, very low volumes where cycle development never pays back, thick flash that cryogenic impact cannot fracture, and cosmetic parts where any risk to show surfaces outweighs labor cost—all stay with knives, scissors, and skilled hands. The cost is well known: minutes per part, operator-dependent consistency, and a shrinking labor pool.
Cryogenic deflashing wins when the profile matches: molded elastomers or thermoplastics, parts small enough to tumble by the thousands, flash thin relative to the part body, and volumes high enough that trimming labor dominates the cost model. When those conditions hold, the per-part finishing cost drops by an order of magnitude against manual work.
For plants running both polymer and metal parts, the technologies coexist rather than compete—the cryogenic drum handles the molded stream while robotic cells handle the machined and cast stream, and our full equipment line covers both sides of that divide.
The Batch Economics of Cryogenic Deflashing
The economics rest on one structural fact: every cost in the process is per batch, not per part. One cycle consumes its liquid nitrogen, wears its media, and occupies its operator’s attention whether it holds 500 O-rings or 5,000. Load the drum properly and the per-part cost divides down to fractions of a cent; run it half-empty and the same fixed consumption spreads across fewer parts. This is why the process rewards high-volume molders and punishes job shops that trickle small lots through the machine.
Contrast the labor arithmetic. A molded seal that takes a skilled trimmer 30 seconds to 2 minutes by hand processes in a drum cycle shared with thousands of identical parts—the marginal labor per part approaches zero. At lot sizes in the tens of thousands, one machine and one loader replace a trimming room. Contract-processing rates for outsourced deflashing commonly land at 10-20% of the part’s value, which sets the ceiling an in-house machine undercuts as volumes grow.
The cost side has two real line items. Liquid nitrogen scales with target temperature depth, batch loading efficiency, and pipeline discipline—a deep-cold silicone recipe costs noticeably more nitrogen per kilogram of parts than a nitrile recipe at -90°C. Media is the second: polymer pellets wear, fracture, and carry out with the parts, so replenishment belongs in the consumables budget from day one. Set against those, the machine itself is modest capital by finishing-equipment standards, and no per-part tooling exists—a single machine switches between part families by changing a recipe, not fixtures.
The break-even question reduces to volume and labor price. High-volume molded polymer parts with flash problems almost always clear the hurdle; low-volume, large, or metal parts belong to the robotic cutting cell or the mold-rework budget instead.
Cryogenic Deflashing FAQ
What temperature does cryogenic deflashing run at?
Process temperatures typically fall between -120°C and -190°C, set by the material: nitrile and EPDM seals commonly run in the -80°C to -110°C band, silicone and other low-Tg elastomers need -140°C to -170°C, and engineering plastics with gate vestige work anywhere across the span. The exact setpoint for a given part is fixed by first-article trials, not by the material datasheet alone.
Does cryogenic deflashing damage the parts?
When parameters are set correctly, no. The flash is thin and fully embrittled while the part body retains toughness margin, and polymer media removes flash by fracture rather than abrasion, so surfaces and dimensions are untouched. The process is thermally reversible—the polymer returns to its normal properties at room temperature with no carryover brittleness. Damage appears only when recipes are wrong: excessive time or temperature can nick thin walls, which is why cycles are qualified on sample parts first.
Which materials cannot be cryogenically deflashed?
The standout exclusion is UHMW polyethylene, which stays tough even at deep cryogenic temperatures and bends instead of fracturing. Size is the other limit—parts beyond roughly 300 mm do not tumble well in standard drums and typically route to dry ice deflashing or manual trimming. Most other common rubbers, plastics, and composites process successfully.
How is deflashing different from deburring?
Deflashing removes flash and gate vestige created by molding. Deburring removes burrs created by machining, stamping, or forming. For polymer parts, the same cryogenic process often handles both in one run. For metal parts, the two require entirely different equipment—cutting tools, abrasives, and robots rather than cold and pellets—because cold does not embrittle most metals the way it embrittles polymers.
Is cryogenic deflashing economical for small production runs?
Usually not in-house. The machine’s value comes from dividing fixed cycle costs—liquid nitrogen, media, operator time—across large batches. Contract processors fill the gap for smaller volumes, with minimum lot charges and per-part pricing well below manual trimming cost. Below a few thousand parts per lot, mold maintenance that prevents the flash in the first place is generally the better investment.

